Garlic is a versatile, flavorful, and nutrient-rich crop that is surprisingly easy to grow at home. One of the most rewarding approaches for home gardeners is planting garlic in winter for a spring or early summer harvest. With proper planning, care, and timing, you can enjoy robust, aromatic garlic bulbs that elevate your cooking and enhance your garden.
This guide provides step-by-step instructions, expert tips, and detailed strategies for successfully growing garlic during winter, ensuring a bountiful spring harvest.
1. Understanding Garlic Growth

Garlic (Allium sativum) is a cold-hardy perennial grown as an annual crop. Understanding its growth cycle is key to successful winter planting:
- Cloves vs. Bulbs: Garlic is planted using individual cloves from a bulb. Each clove grows into a new bulb.
- Winter Dormancy: Garlic requires a period of cold (vernalization) to develop bulbs properly. This is why planting in late fall or early winter encourages strong growth and larger bulbs in spring.
- Leaf Development: Leaves emerge in early spring and help produce energy for bulb formation.
Benefits of Winter Planting
- Larger, more flavorful bulbs due to cold vernalization.
- Reduced pest and disease issues in early growth stages.
- Early spring harvest before summer heat stresses the plants.
Tip: Plant garlic in winter about 4–6 weeks before the ground freezes, allowing roots to establish without premature leaf growth.
2. Choosing the Right Garlic Variety

There are two main types of garlic:
- Hardneck Garlic
- Produces a stiff central stalk with scapes (flower stalks).
- Thrives in colder climates.
- Offers strong, complex flavors, ideal for roasting or fresh use.
- Softneck Garlic
- Produces more flexible stems; ideal for braiding.
- Performs well in milder winters.
- Generally stores longer and produces larger bulbs.
Popular Winter Varieties
- Hardneck: Rocambole, Purple Stripe, Porcelain
- Softneck: Silverskin, Artichoke
Tip: Choose varieties suited to your climate: hardneck for cold winters and softneck for milder regions.
3. Preparing the Soil
Garlic thrives in loamy, fertile, well-draining soil with a pH of 6.0–7.0. Preparing the soil properly ensures healthy root development and robust bulb growth.
Steps for Soil Preparation:
- Clear the Bed: Remove weeds, debris, and old plant material.
- Loosen the Soil: Dig or till to 8–12 inches to allow roots to penetrate easily.
- Add Organic Matter: Mix in compost, aged manure, or well-rotted leaf mold to enrich fertility.
- Adjust pH if Needed: Use lime to raise pH or sulfur to lower it, based on soil test results.
- Ensure Good Drainage: Garlic bulbs rot in soggy soil, so raised beds or well-draining plots are ideal.
Benefits:
- Encourages strong root and bulb development.
- Reduces risk of fungal diseases and waterlogging.
- Provides nutrients necessary for robust growth throughout winter and spring.
4. Selecting and Preparing Garlic Cloves
Only healthy, disease-free cloves will produce quality bulbs.
Steps for Clove Preparation:
- Choose Large Cloves: Larger cloves produce larger bulbs. Avoid using cloves from supermarket bulbs, which may be treated to prevent sprouting.
- Separate Bulbs Carefully: Do not damage the base or outer skin of cloves.
- Optional Pre-Sprouting: Some gardeners pre-sprout cloves indoors 1–2 weeks before planting to give them a head start, though this is optional for winter planting.
Tip: Plant cloves with the pointed end facing up and the flat root end down.
5. Planting Garlic in Winter

Timing
- Ideal: 4–6 weeks before the soil freezes.
- This allows root development without premature top growth.
Planting Depth and Spacing
- Depth: Plant cloves 2–3 inches deep; cover with soil.
- Spacing: Space 6–8 inches apart, with rows 12–18 inches apart for proper airflow.
Mulching
- Apply 2–4 inches of mulch (straw, leaves, or grass clippings) after planting.
- Mulch protects roots, prevents soil freezing and thawing cycles, and suppresses weeds.
Benefits:
- Winter-planted garlic develops strong roots early.
- Mulch insulates soil, reducing frost heaving and moisture loss.
- Proper spacing prevents overcrowding, which improves airflow and reduces disease risk.
6. Watering and Winter Care

Even in winter, garlic needs moisture for root growth, though overwatering can be harmful.
Watering Tips:
- Water lightly after planting to settle the soil.
- Reduce watering in extremely cold conditions to avoid frozen, waterlogged soil.
- Resume regular watering in early spring as the weather warms and leaves emerge.
Winter Protection:
- In very cold regions, apply additional mulch or frost cloths.
- Avoid stepping on beds to prevent soil compaction.
Tip: Remove excess mulch in early spring to allow soil warming and encourage vigorous growth.
7. Fertilizing Garlic
Proper nutrition is key for robust bulb development:
Fertilization Strategy:
- Before Winter: Incorporate compost or balanced organic fertilizer into the soil.
- Early Spring: Side-dress with nitrogen-rich fertilizer when shoots emerge to support leafy growth.
- Mid-Spring: Continue light fertilization every 4–6 weeks until scapes appear (for hardneck varieties).
Benefits:
- Strong leaves enhance photosynthesis, supporting larger bulbs.
- Prevents nutrient deficiencies, such as yellowing leaves or stunted growth.
Tip: Avoid excessive nitrogen late in the season, which can reduce bulb size and storage life.
8. Controlling Pests and Diseases

Garlic is generally hardy, but winter and spring growth can be vulnerable to pests and fungal diseases.
Common Issues:
- Fungal diseases: White rot, downy mildew, rust.
- Insects: Onion maggots, aphids, thrips.
Preventive Measures:
- Plant in well-draining soil to reduce fungal risks.
- Rotate crops annually; avoid planting garlic in the same location consecutively.
- Inspect plants regularly and remove affected leaves.
- Use organic sprays or neem oil for insect control.
Tip: Avoid planting garlic near potatoes or onions prone to similar pests and diseases.
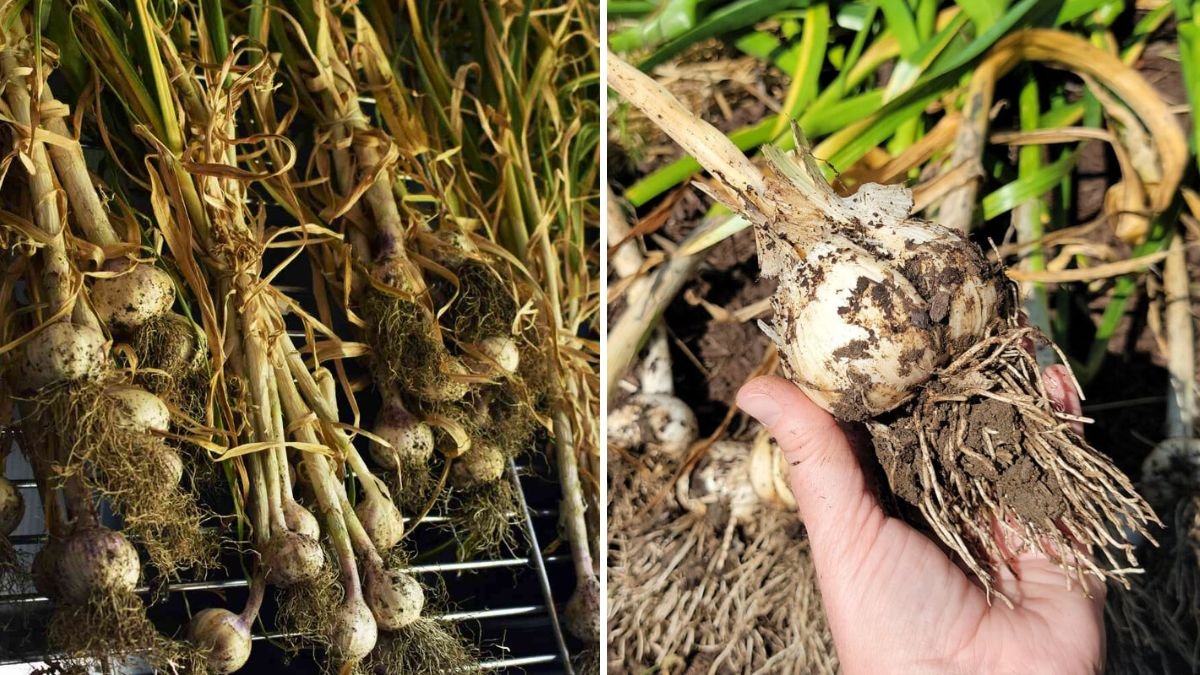
9. Harvesting and Curing
Winter-planted garlic is typically ready for harvest in late spring to early summer, depending on your climate and variety.
Harvesting Steps:
- Check Leaves: Harvest when the lower 2/3 of leaves turn yellow but the top leaves remain green.
- Lift Bulbs Carefully: Use a garden fork to avoid damaging bulbs.
- Curing:
- Hang bulbs in a well-ventilated, shaded area for 2–3 weeks.
- Avoid direct sunlight, which can scorch the bulbs.
- Cleaning: Remove excess dirt but leave outer skins intact for storage.
Benefits:
- Proper timing ensures maximum flavor and bulb size.
- Curing prolongs storage life for several months.
Tip: Store garlic in a cool, dry, and well-ventilated location to prevent sprouting or rotting.
10. Benefits of Winter Garlic Planting
- Larger Bulbs: Cold exposure improves bulb size and flavor.
- Early Harvest: Allows spring harvest before summer heat or pests affect growth.
- Low Maintenance: Garlic requires minimal care once planted and mulched.
- Natural Pest Resistance: Garlic’s pungent aroma can deter certain garden pests.
- Culinary Value: Freshly harvested garlic enhances cooking and provides nutritional benefits.
Winter planting combines the advantages of cold hardiness and low-maintenance care, making it ideal for home gardeners seeking robust, flavorful garlic bulbs.
Conclusion
Growing garlic in winter is an effective and rewarding strategy for home gardeners. By understanding garlic’s growth cycle, selecting appropriate varieties, preparing the soil, planting cloves at the right depth, providing mulch, and ensuring proper care throughout winter and spring, you can enjoy a bountiful harvest of healthy, flavorful garlic bulbs.
From winter planting to spring harvest, garlic rewards patient gardeners with aromatic, nutrient-rich bulbs that enhance culinary creations and support a thriving garden ecosystem. With proper planning, this cold-season crop can thrive effortlessly, making your homegrown garlic experience both productive and enjoyable.
Winter-planted garlic not only guarantees early spring harvests but also ensures that your garden remains productive, flavorful, and colorful, even as other crops are just beginning their growth cycle.